More photos in the DR Preparation gallery – HERE
Why a DR650?
Replacing my F650 was an opportunity to take a slightly different approach and incorporate much of what I’ve learnt over the last 4 years. What have I learnt? Well, if you want to travel off the beaten track then weight is the key. My F650 took me to places I would never have believed possible prior to leaving home but at great expense to the chassis. A lighter bike and kit mean its gentler on its suspension so requires lighter springing which in turn puts less strain on surrounding components – at least that’s my theory. Lady P weighed 300kg + food & water. I’m hoping the DR will weigh in around 220kg. I’m hoping too that it won’t just mean it’s more reliable on the kind of terrain I’ve traversed so far, but that I’ll be able to tackle routes that I would have considered ‘off-limits’ on my F650.
26/08/10 – Weights: Inc ALL tools, consumables, tubes & GPS but with NO fuel =163.5kg. Fully loaded inc 35l fuel but NO food or water = 217kg. These weights came from the cement works in Moab, Utah. The original weights were given in lbs – 360 & 480. The figures are so ’round’ that I later wondered what increments and ’rounding’ figures they used.

2006 Catalogue image

My 2006 DR650 was far from stock when purchased…
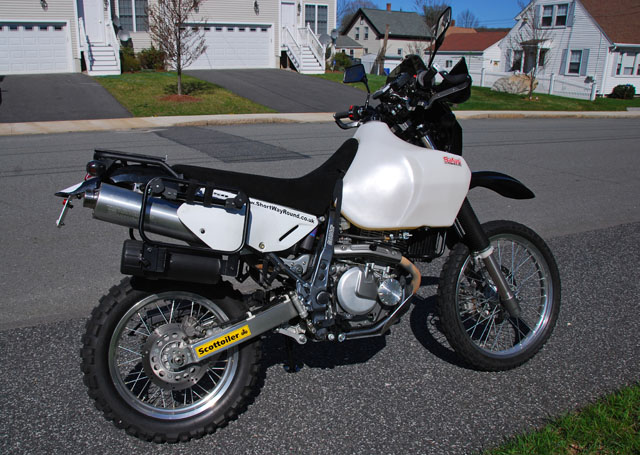
My DR650 RTW Ready

Fully Loaded

And in her final incarnation
Another thing I want to ensure is that all tools and spares are carried on the bike and not in my luggage. On many occasions I’ve had the opportunity to ride without luggage but I’ve always been concerned about not having all I needed to repair a flat tyre etc.
A smaller, lighter package will also reduce the cost of airfreight and may make it a feasible option again.
My first choice was a Suzuki DRZ400. Contrary to popular belief you don’t need a big engine to travel the world. Once out of
Western Europe and off the tarmac of Australia the majority of time is spent below 90km/h. Unfortunately it was my short legs that finally made my decision for me as at 935mm the 400 seat is 50mm higher than the 650. It doesn’t sound much but believe me it is when you’re 5’4”!
The DR650 had other benefits too. Air-cooling, adjustable tappets and a three bolt front sprocket all bode well for overland travel. Being Japanese it uses a very small range of fixings (bolts etc) which in turn reduces the number of tools required and will add to the weight saving. Unlike the F650, it needs no special tool for the steering head bearings and a trial run proved I can break the bead of the rear tyre using just my feet and two tyre levers. That was something I couldn’t do on the F650 so I had to carry a heavy cramp to do the job. My toolkit for the BMW weighed a staggering 5.75kg and whilst I haven’t yet been able to weight it I think the DR toolkit will weigh in around 1-1.5kg.
Why didn’t I leave home on a DR650?
That’s a good question. Looking back it seems that most of our bike research was based around Chris Scott’s Adventure Motorcycling Handbook an excellent source of information but upon looking through it again when visiting Maarten & Ilse I noticed it to be fairly dismissive of the pre-’96 DR and barely mentions the post-’97 model (probably because it wasn’t officially imported into the UK).
Of all the other Overland motorcyclists I’ve met, the DR650 has been the equal most popular along with Kawasaki’s KLR650 (8 of each) followed by the BMW F650 and Honda Africa Twin (6 each). This is contrary to the impression given by the book. Every DR650 owner I’ve met has had the same thing to say about them. “They’re bomb proof!”.
Preparation
There is really no need to go to the lengths I have with my DR to prepare an Overland bike but my bike is my home away from home and there are some comforts I appreciate.
Some of the ideas I’ve incorporated have come straight from the BMW whilst others are those I’ve dreamt up during my 4 years on the road. Only time will tell whether they work or not.
Below is an overview of my DR preparation along with some of the reasons why I’ve done things.
Ergonomics
Being comfortable on the bike both sitting and standing is an important consideration in an overland bike. Whilst the seat is the most obvious consideration so is the height and bend of the handlebars, the size of the footrests (if you ride off-road) and the relationship between all of them. If you ride off-road you’ll also need to find a set-up that works whilst sitting and standing.
Seat – Unfortunately, in order to be comfortable a seat needs to be reasonably wide – just what you don’t want when standing. My biggest investment in the DR came in the form of a Renazco rally seat. It’s normal width at the front but splays out slightly further back to give a wider seat when sitting without compromising the standing position. It’s covered in suede which will not only keep it cool when the weathers hot and warm when the weathers cold, but provides good grip for your knees when standing. I had mine built 1” lower than stock for my short-arse legs.
26/08/10 – The seat has proven to be beyond uncomfortable – its painful; and I’ve ridden a R1 from England to Spain! I’ve been in contact with James Renazco and will be visiting him at the end of next month to try to resolve the problem. He suspects it is because I’ve had it built 1″ lower and am lacking cushioning. If that proves to be the case then I’m in a real dilemma as I can only touch the ground with the ball of one foot now and I don’t want to have to compromise my suspension. I’ll post again once I’ve visited James.
02/01/11 – I visited Renazco back in September 2010 (See Chapter 23) and after discussing my problems with owner James, he built me a new seat. 1/2″ taller, repositioned seams and and extra layer of foam should have led to a much more comfortable seat. Unfortunately, whilst a small improvement was made, it remains the most uncomfortable seat I’ve ever had and remains my only real gripe with the bike. In less than 2hrs my thoughts turn from what’s going on around me to how much my arse hurts!
Footrests – My DR came with oversize footrests and a footrest lowering kit fitted. I’ve kept the oversize footrests but removed the lowering kit. I’ve also replaced the OE mounting bolt washers with larger ones to lock-up the rubber mounting and give a more positive feel to footrest input.
Handlebars – My DR came with ProTaper CR High bend bars which I like but the additional 2” risers didn’t suit me and were replaced with 1” spacers (courtesy of the ‘homework’ dept of my previous employer – no names mentioned)
Fuel System, Exhaust and Lubrication
My bike came fitted with a 39mm Flat Slide Kehin carburetor, cut out airbox (link) and GSXR Silencer/Muffler mod (link). Together they improve throttle response and correct the slow speed surging often experienced with the standard set-up. The exhaust system is also several kilograms lighter than stock.
The Safari 30l tank should give a fuel range of approximately 550km and I’ve added a tap for filling my camping stove as I did on the BMW. The aluminium cross brace supplied with the tank is rather poor so I fabricated a steel one. The petcocks supplied with the tank had plastic taps and have caused problems for some so I replaced them with alloy ones. Another potential problem is getting the last few litres of fuel out of the tank as the carburetor inlet sits higher than the petcocks. Most people create pressure in the tank by blowing into the vent pipe so to maintain this pressure I’ve added a one-way valve. Last but not least I added inline filters to each tank outlet.
26/08/10 – The exhaust mid-pipe and silencer fell off in the San Rafael Desert in Utah (see Chapter 22). The mid-pipe welded bracket had failed and the silencer mount added by the previos owner ripped out of the silencer. I found another silencer on ebay and purchased a Two-Brothers mid-pipe kit from Kientech.
02/01/11 – No problems since fitting the above parts
The Safari tank actually holds 35l/9.5 US Gal
The carburetor breather/vent tubes were fitted with T fittings and extra tube run up to the headstock. If all the breathers were submerged in a water crossing the engine would die. I replaced the cross head screws in the airbox and manifold clamps with cap heads.
I fitted an additional tap with an outlet for filling my camping stove, an addition that worked very well on the BMW.
The paper oil filter has been replaced with a washable stainless steel one.
Luggage
In a bid to reduce weight I’ve opted to use soft panniers on the DR. They still need supporting to stop them bouncing around and to keep them away from the exhaust and so I’ve used MotoSport pannier frames and added a couple of loops to enable me to run some extra straps around the panniers. I also added some brackets for fitting a ‘tool tube’ (see tools/spares).
Soft panniers meant finding a new place to carry my laptop and so I’ve used a 1400 Pelicase for which I’ve made a quick-release mounting.

The black plastic came from a chopping board

Case slider onto a mounting on the rack

…and locks in place
To keep the weight as central as possible I’ve made a detachable ‘loop’ that mounts to the rack and allows me to carry my camping kitbag on the pillion seat.

Detatchable loop for strapping camping bag to

2 M8 nyloc nuts fix the loop to fittings welded onto the OEM rack
26/08/10 – I found the riding position with this set-up too restrictive. It also meant wearing my daysack which was ok in thecold weather but soon pissed me off when it warmed up. I couldn’t find a sheet metal worker at the time so I purchased a rack from Happy-Trails and used it to replace the Peli-case and detatchable hoopset-up. My daysack now contains my laptop and strapsto the top of my Ortlieb duffel bag.

Happy Trails Rack
14/05/11 -The Happy Trails rack was always a temporary fix removing the panniers and/or the seat necessitated its removal. I had hoped to modify the OEM rack in LA but I only had Tito for one evening and so had to prioritise what I wanted him to do. Finally I found a place in Colombia (See Chapter 25 – South to South America) where I had some additions made to the OEM rack. See photo.

Rack additions allow removal of seat & panniers
Up front I’ve fitted some Aerostich tank saddlebags, in which I keep my stove and food. The bottoms of the bags are held in place with built-in bungee cords but with nowhere to attach the hooks I added 4 dedicated loops. One on the stove tap mounting, one on the exhaust header cover and two on the Safari tank cross brace. The right-hand one of these also needed a spigot(?) welded onto the oil cooler protection bar to help the bungee route around the oil cooler.
26/08/10 – I managed to totall destroy the zip in one of the tank panniers my trying to overload it. Aerostich replaced the zip for $20 +$4 postage and did so very quickly.
How to carry water was my biggest challenge luggage wise and after several prototype designs eventually settled on the one in the picture. It uses the passenger footrest mounts and is easily detachable for trail riding by removing 1 x 6mm bolt and 1 x M8 nyloc nut. Unfortunately they weigh approx 400g each but it was the best I could come up with and allows me to carry 10l of water as I did on the BMW.

Rear footrest mounted brackets carry5l water each
26/08/10 – I was never totally happy with these as they’re made of cheese, but despite dropping the bike a few times and bending the carriers I’ve easily straighteded (kind of!) them by hand. I did manage to puncture one of the water containers by failing to see a protruding branch whist looking for a bush camp and I can’t find a replacement – yet.
02/01/11 – One of the bottles/brackets fell off somewhere on the CDR, the other broke off in my hand after straightening it onece too often. I’m yet to find a suitable, stronger mount.
Lastly a small tankbag (Wolfman Enduro) for my camera.
26/08/10 – Having short legs this gets me right in the nads when standing up. Ideally I’d like to find something of the same volume (orslightly bigger) but that sits across the tank at 90°
Chassis
Brakes – After servicing both brake calipers (using an anti-seize compound on the pad retaining pins) I added a stainless steel hose to the brake and filled both reservoirs with DOT 5.1 fluid (higher boiling point than DOT 4). Another part that often gets overlooked is to clean and re-grease the rear brake pivot with waterproof grease.
26/08/10 – The front brake pads wore out rather quickly and all I could get at the time were EBC Red and I don’t like them. They don’t have the bite of the OEM pads and require a lot more lever pressure which in turn means less feel.
02/01/11 – Replaced front brake pads after 33,000km. Plenty of material left on the pads but I don’t like the feel of the EBC and have gone back to OEm Suzuki.
Suspension – Like all Japanese dual-sport bikes the DR comes with very basic suspension (it’s one area manufacturers cut corners with to keep prices down) and therefore it needed upgrading. After the abysmal after sales service I experienced with the Ohlins rear shock on the BMW I wanted to modify the OE Suzuki shock rather than replace it. I found the ideal solution in North Carolina’s Cogent Dynamics who re-built the OE shock with quality internals and added adjustable rebound damping along with suitable spring (7.6kg/mm). Rick (the owner) even included a repair kit of seals should I run into problems overseas. He also keeps all of the parts in stock and is happy to send whatever I may need to wherever I may need it – music to my ears after the Ohlins fiasco!

26/08/10 –The rear shock is fantastic. No bottoming despite the load I’m carrying and yet I can unload the bike and go trail riding. The rear does spin-up a ittle too easily on hard loose surfaces but that may be down to the lack of low-speed compression damping?
The forks have been fitted with 0.48kg/mm Eibach springs and Race-Tech ‘Gold Valve Emulators’ (which I used to great effect in the BMW) and 10w oil. Fitting these involved drilling extra holes in the damper rods, which in turn led to the need to make a special tool to disassemble the forks. Thanks to the DR Wiki page for the tip on how to make the tool using a ¾” bolt, 2 nuts and a 14” extension bar.

Additional holes drilled in damper rod (forground)
26/08/10 – The front is ok but not perfect and I still can’t put my finger on why. It doesn’t help that the load on the front end varies enormously depending on how much fuel I’m carrying and how full my food bags (tank panniers) are. The front tends to try to ‘plough’ if I’ve not got my weight in the right place and is quite harsh on steep bumpy descents. Probably because the forks are riding along way down in their stroke. I’m not sure there is a perfect solution because the weight varies so much so I’ve learnt to ride it the way it is. Doesn’t stop me having fun 🙂
The linkage bearings along with the swingarm and steering head bearings and top shock mounting were stripped, cleaned and packed with waterproof grease.
01/02/11 – In San Diego I had planned to strip & grease the steering head bearings but with the front wheel out I could feel they were notched. With just 50545km on the clock I was rather disappointed, but thinking back I seem to recall leaving them a little tight and expecting them to settle in. That appears to have been a mistake and so I had a new set sent to Mexico City and replaced them there at 55949km.
Wheels – The wheels remain standard but I’ve prepared them as I would an endure bike. The rim tape has been replaced with five layers of duct tape and the valve holes elongated to allow the valve free movement should a tyre ‘creep’ on the rim (valve nut is screwed up against valve cap). I then fitted HD inner tubes.
Chain & Sprockets – The OE chain & sprockets are 525 on the DR which is rather unusual. Before leaving north America I’ll change these for the more common 520 (and use different sizes) but in the meantime I’ve swapped the front sprocket from a 15T to a 14T (an easy job on the DR thanks to the 3-bolt design). I’ve also fitted a Scottoiler that I had great success with on the BMW but this time I have used the ‘lube tube’ and fitted it behind the OEM tool tube. Fitting the Scottoiler wasn’t straightforward because of my bike being fitted with a ‘pumper’ carb and therefore not having vacuum fuel taps. I ordered the universal adaptor and drilled the manifold rubber to fit it.
26/08/10 – The OEM chain and rear sprocket lasted 27k km which was less than I expected. I used several front sprockets in that time both 14 & 15T. I swapped to a 520 chain but couldn’t get a 45T sprocket so plumbed for a 46T to make 15:46. It sucks! I definately want 15:45.
02/01/11 – The (DID) 520 chain only lasted 22,000km which I was very disappointed with. I did have a few issues with my Scottoiler which meant it wasn’t always correctly lubed. I also lost my last spare sprocket when I lost my tooltube (Chapter 23) so running with an excessively worn front sprocket will have contributed to the chain wear. NOTE – 520 front sprockets need replacing every 6000km.
14/05/11 – The next (DID) 520 chain again only lasted 22,000km so I’ve decided to return to 525. As X-ring chains are now just a little more expensive than O-ring (in the UK at least) I’ve also decided to go X-ring. The change will also allow me to run what I think will be the optimum gearing for me 15:45. I’ll be using OEM front sprockets and a 45t rear from Kientech.

Scottoiler location and additional fuel tap

Scottoiler ‘Lube Tube’ tucked behind OEM tooltube
Sidestand – With the bike fully loaded the sidestand was too long causing the bike to sit precariously upright. I shortened the stand by cutting out a 25mm section and inserting a strengthening sleeve before welding it back together. I also added a larger ‘foot’ to better spread the load on soft ground.
26/08/10 – I should have lubricated the sidestand when it first started getting stiff but I didn’t. The result is that it has worn VERY quicky and now fouls the swingarm in the folded position. I need to fix this properly with a welder and a grinder but for now I’m using a bungy to hold it away from the swingarm.
02/01/11 – The stand was removed ad a bead ow weld was run along both the frame and the inside of the stand pivot. Once ground down the stand was back to normal.
Electrical System & Lighting
My DR came to me with the huge rear light assembly already replaced with one from a DR250 (OEM on Australian models), LED licence plate lights and smaller indicators from a Buell.
The wires on the LED’s disintegrated when I touched them and so I replaced them with a 6 LED panel.
Headlight – Not riding at night is one of the golden rules of overland travel by motorcycle and I avoid it most of the time. There have been occasions though where I’ve been caught out and where I would really have benefitted from better lighting. However, as these times are few and far between I didn’t want to spend any money on expensive additional/replacement lights. The solution (though I’ll have to wait to prove it) seems to have come simply and cheaply in the form of a simple relay circuit and a better bulb. The theory: The stock headlight circuit uses small gauge wire connected through the switch to supply the headlight. This modification uses the OEM wiring to switch one of two relays (1 High beam, 1 Low) which in turn connect the headlight direct to the battery via larger gauge wires and an inline fuse. This system reduces the voltage drop to 0.1v; a drop of 1.0v can equate to a 25% reduction in the headlights ‘output. I also added a Phillips X-Treme headlight bulb of the OEM rating 60/55w.
26/08/10 – I’ve ridden in the dark a few times over the past few months and have been very impressed with the mods so long as I keep the speed to 80km/h max.
02/01/11 – The Phillips headlight bulb (and the spare) both blew their dip beam filaments very quickly. I’m now using a 100/55W Heavy Duty bulb which has a thicker filament.
Switchgear – L/H – The OEM switchgear has no ‘OFF’ position so I replaced it with a KLS switch that does. It also has a blue LED on the top to indicate MAIN beam which is quite handy as I discarded the ‘idiot’ lights. It is also narrower than the OEM switchgear which made space for an independent mirror mount. I lost the OEM clutch mounting when I changed the lever (see Cockpit).

KLS switchgear adds ‘OFF’ position
Auxiliary Power – Two waterproof fuses behind the R/H side panel protect both permanent and ignition feeds. The permanent (battery) feed supplies the Trailtech computer and the GPS. The GPS circuit also contains its own 1.5A fuse and an isolation switch with LED (as per my BMW). Those of you with a Garmin 276c will know that when it’s turned off it still displays the battery condition which puts quite a drain on the battery. The ignition feed supplies charge to my laptop (in the Pelicase), a BMW style power socket (for BMW heated vest), a cigarette socket (for iPod charging) and the heated grips. The charge circuit is also switched.

All auxiliary connections were made with OEM type connectors…

…and fitted into the original space
General – After checking for chaffing (nobody likes chaffing J ) and rerouting a few cables I cleaned every connector with electrical contact cleaner and re-assembled them with Di-Electric grease.
Cockpit
Main consul – The cockpit is dominated by the GPS unit mounted on a Touratech MvG mount (from my BMW). I wanted to mount it so I could see it whilst sitting and standing and doing so obscured the view of the Trailtech. To overcome this I made a bracket to mount the Trailtech to the MvG mount. As I use braceless handlebars, I also needed a mounting for the MvG. By using the OEM handlebar clamp bolts from my BMW (they have a female thread inside) I was able fabricate a mounting that included both power sockets, both isolation switches, the heated grip switch, iPod remote, GPS fuse and MvG mount.

GPS mount, auxillery sockets and switches
01/02/11 – After my GPS packed up on my first day in Mexico I took it off and packed it in my luggage. Despite doing so the bracket I’d fabricated broke through vibration on the ‘Road of Stones’ (Chapter 24). I’m not sure whether I made it from to thin a gauge of steel or whether it was my inadequate welding skills that weakened it from the outset! I got it beefed up in Mexico City.

My dashmount failed on the ‘Road of Stones’
Clutch lever – The OEM Suzuki clutch lever has just one clamp bolt meaning removal involves sliding it off the handlebar, which in turn means cutting off the grip and removing the grip heater. As I have small hands I always use an adjustable span lever and so fitted an ASV F1 universal lever which has the more usual two bolt clamp for easy removal. Changing the lever meant losing the mirror mount, hence the addition of the dedicated one.
Screen – The screen is from Laminar and is for a Suzuki Speed King. I found a picture of it on ADVRider and it seems to be just the right size for what I want. I didn’t have much success with the supplied 3M DualLock mounts and so drilled the headlight cowl and fitted ‘Well nuts’ then used countersunk machine screws with black plastic screw cover to finish it off.
26/08/10 – The scree has provided great protection but generates some noisey turbulance. This may not affect a taller rider so much but I will experiment with some kind of ‘flip’ when I find some suitable material.
With the GPS tilted forward to where I wanted it, the screen sat too close to access the MvG key and also forced the brake hose to foul the GPS antenna. I made additional aluminium brackets to tilt the headlight cowl forward slightly (lower fixing remained untouched) gaining me sufficient clearance.

Laminar lip screen is from a Suzuki ‘B-King’
Protection
My short legs often lead to stupid crashes where a quick ‘dab’ would save the day for most riders. This is usually the case in water crossings and when the going gets slow and rocky thereby making the risk damaging a casing higher for me than most. To that end I’ve fitted ignition, clutch and oil filter housing covers. The bashplate on my BMW took a real beating so I opted for what seems to be regarded as the best available – the Australian made B & B Engineering.
Levers are protected by Cycra handguards and the ASV clutch lever is alleged to be ‘unbreakable’. It is designed to allow the lever to fold out as well as in.
Tools and Spares
Removing the seat on the DR for the first time was a revelation. Every fixing I could see used either a 10 or 12mm spanner or a screwdriver – far simpler than the multitude of tools needed to work on the BMW.
After exchanging a few emails with Tim Hobin (see previous chapters) and spending a while working on the bike I came up with the following toolkit. Replacing the sump plug bolt with one from the timing mark inspection hole was a great tip from Tim and ruled out the need to carry any 3/8” drive tools.
By proving I could break the bead of the rear tyre with just my riding boots and two tyre levers I eliminated the heavy clamp I had needed to carry on the BMW and with a ‘normal’ method of adjustment for the steering head bearings I also eliminated the special tool I’d made in Australia for the BMW.
The upshot of all this is that I’ve reduced my toolkit weight from 5.75kg on the BMW to 1,75kg on the DR.

DR toolkit
Toolkit contents:
Combination spanners 8/10/12/13/14
¼” Drive sockets 6/8/10/12/13/14 – 6mm for main jet
¼ Drive ratchet (Husky)
¼ Drive T bar
Allen Keys (Ball End) 2.5/3/4/5/6
Allen bits 8/10 (these came from ⅜ sockets and I cut them from the casings. They fit in an 8mm socket)
¼ Drive screwdriver bit holder
Bits for above – #2 & 3 Phillips , #2 & 3 Flat
Float bowl spanner (Motion Pro)
OEM front spindle spanner (19mm)
Combination tyre lever/24mm spanner for rear spindle (Motion Pro)
Sparkplug socket and bar (bar doubles as a punch)
Pin punch (cut down) for brake pads
4” Vice Grip
Sawzall blade
Soldering iron (uses lighter fluid)
Feeler gauges (stripped down selection)
Chain Tool (Ballards Australia)
Small Multi-Meter
Tyre pressure guage
Tube valve snake – again, small hands make poking the valve through the rim very hard so I’m going to
try one of these. The ‘handle’ incorporates a valve removal tool.
MTB pump
Small torch
Toothbrush – chain cleaning
Cut-down filler for Scottoiler
Spares – After meeting many DR riders along the way I’ve decided to carry a very limited selection of spares. They include a gearbox output shaft seal, fork seals, a complete rear shock seal kit (kindly donated by Rick at Cogent Dynamics), fuses, headlight and taillight bulbs, front sprocket, chain links, front and rear inner tubes, MTB derailleur cable inner (will repair throttle or clutch cable) and screw-on cable ends, Scottoiler ‘injectors’, carburetor jets (for altitude change).
Consumables – JB Weld (Araldite), Quicksteel, Superglue, Loctite, anti-seize compound, solder, puncture repair kit (plenty of patches & glue), Schrader valves & caps, Duck tape, electrical insulation tape, electrical wire, Scotchbrite, emery cloth, a length of fuel hose, 2 x fuel hose clamps and a selection of nuts/bolts/washers, zip-ties.

Contents pack into the plastic tub pictured
Carrying all the above – One of my goals with the DR was to build a bike light enough to run on lightly sprung suspension that is a pleasure to ride unloaded as well as loaded – something the BMW wasn’t. To be confident riding the bike unloaded means that the bike has to carry all the tools/spares/consumables and NOT the luggage.
I first saw the ‘Agri Supply’ tooltube (used for storing the workshop manual on a tractor I believe) on the ADVRider website but it was too small for what wanted it for. Then, sometime over the winter, a saved search for DR parts on Ebay came up with the ‘Mega Tool Tube’, which with an internal diameter of 4¼” is the perfect fit for a rolled inner tube. I fabricated and welded two additional brackets to the R/H pannier frame for mounting the tube under the exhaust can. An additional bracket on the lid makes it lockable. The tube contains 2 x tubes, 1 x tyre lever (the other fouled on the spares tub), ¼” T-bar, toothbrush and the spares tub pictured below.

Tooltube contents
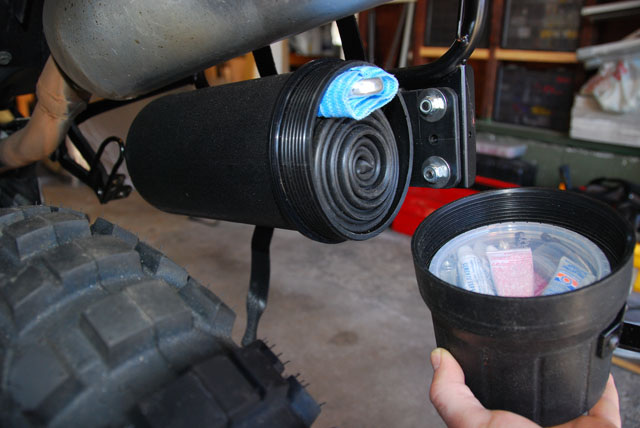
Consumables, 2 tubes, T-bar and tyre levers
The toolkit fits inside the OEM tool bag inside the OEM tool tube along with the soldering iron, Scottoil filler and chain tool.
The pump mounts inside the L/H pannier frame (See Prop Stand in Miscellaneous below)
Quicksteel, Scotchbrite and emery cloth fits under the seat and a 125ml bottle of Scottoil fits in front of the airbox on top of the shock.
A length of fuel hose is zip-tied to the L/H subframe along with the tyre lever that wouldn’t fit in the tube.
Head and tail light bulbs are wrapped in bubble wrap and packed inside two ketchup bottles (tops cut off then one pushed inside the other so both ends are closed) and zip-tied in a ‘recess’ under the rear mudguard.
Still outstanding are the seal/jets kit and the nuts/bolts/washers (which are packed in an Altoids mints tin). Having run out of places to pack stuff they may have to live in my rucksack on day rides.
26/08/10 – When the exhaust fell off it melted a hole in the tooltube so I replaced it. The new evhaust system has the silencer sitting at a slightly different angle and prevented me from re-mounting the tooltube. I re-drilled the pannier frame mounted brackets so I could mount the tooltube lower down but that allowed the tooltube mounts to overhang them which meant they could flex. And flex they did until they broke a second tooltube. I need to find somewhere to fabricate some longer, thicker brackets and weld them to the pannier frames.
02/01/11 – My second tooltube broke its mountings and eventually fell off somewhere on the CDR (Chapter 23). It has been replaced by the aluminium one below.

Aluminium Tooltube
Miscellaneous
Fixings – The screws in Japanese switchgear is notoriously soft and so I replaced them all with cap head bolts. I did the same with the cross head fixings on the ignition coil.
Brake Hose – Tilting the GPS forward to enable viewing whilst standing, caused the front brake hose to potentially ride up over the antenna and snap it off. A combination of altering the angle the brake hose attaches to the master cylinder, modifying the headlight cowl and re-positioning the top hose guide loop seems to have cured this.
Prop Stand – I didn’t want to fit a centre-stand to the bike so instead cut-down an adjustable length walking stick and fitted rubber feet to either end. It fits to the bike inside the R/H pannier frame with two ‘floating’ cigarette lighter socket mounting clips and a wrap around Velcro strap for extra security.
The pump fits in the same way inside the L/H pannier frame.

Prop stand in use

Prop Stand stored
I think that about covers it but will add more if I think of anything. I’ll finish off with a final list of mods along with my working ‘To-Do’ list that those of you building DR’s may find useful. There are more photos in the Gallery under DR Preparation.
Modifications – front to rear
- Slot & tape wheel rims, fit HD inner tubes
- Strip forks, drill damper rods, fit emulators, make spacers to suit, fit new springs and oil, reassemble
- Strip and grease steering head bearings, reassemble, adjust and torque
- Fit fork legs, service brake calipers, fit stainless steel brake hose, modify headlight cowl for brake hose re-route, fit brackets to tilt cowl forward slightly.
- Fit handlebar risers, grip heaters, grips and make all necessary electrical connections
- Fit L/H switchgear and re-wire.
- Fit clutch lever, mirror mount, replace all switchgear screws with cap heads
- Fit GPS/Switchgear mount, fit switches and make necessary electrical connections
- Handguards – fit
- Fit headlight relays and route wiring. Replace headlight bulb
- Screen – fit
- Replace coil mounting screws
- Check all cables and wiring for chaffing – re-route as necessary
- Scottoiler – fit
- Safari tank – fit. Add inline fuel filters
- Aux fuel tap for stove
- Fit 14T front sprocket
- Bashplate
- Engine guards
- Strip and clean carburetor. Note jet sizes. Re-route breather tubes
- Add washers to stiffen footrests
- Service engine – check valve clearances, replace sump plug with ignition inspection cover plug, change oil, fit washable stainless steel oil filter
- Clean and oil air filter
- Strip, clean, grease, reassemble rear suspension linkage and torque
- Strip, clean, grease rear brake pivot
- Fit rear shock
- Fit aux wiring fuses, make necessary connections and route wires to front and rear
- Fit rack, drill rear mudguard to suit
- Fit pannier frames (longer bolts & nyloc nuts), tool tube, pump and prop stand mounts.
- Make Q/R system for Pelicase
- Licence plate LED – fit and connect
- Clean and grease all electrical connections and switches
Fabrication list – front to rear
- Aluminium brackets to tilt headlight cowl forward
- Handlebar risers (Thanks to Mr.X and my previous employer J)
- GPS/Switch mounting plate
- Safari tank cross brace – weld
- Add spigot to oil cooler guard for bungy location – weld
- Aux fuel tap/bungy loop bracket
- Side Stand – shorten 25mm and add larger foot – weld
- Water container carriers – weld
- L/H pannier frame – add ‘guide’ loop for flat strap – weld
- R/H pannier frame. As above plus mountings for tool tube – weld
- Aluminium mounts for pump and prop-stand clips
- Removal ‘hoop’ for rack – weld
- Add ‘hoop’ mountings to rack – weld
- Bracket to lock tool tube
- Bike prop
Already completed by previous owner:
- Grind off header weld
- Fit better handlebars – ProTaper Evo (CR High bend)
- By-pass clutch and sidestand switches
- Loctite & lockwire NSU screws
- Fit Kehin 39mm FCR carb
- Fit GSXR exhaust can and fabricate stainless mid-pipe
- Cut-out airbox top
- Fit large footrests
- Replace rear light with DR250 unit
- Fit smaller indicators (from Buell)
If I’ve missed anything out let me know and I’ll add it.
PHOTO GALLERY -click the Smugmug logo
![]()
Awesome! Have to say I don’t understand most of it but if I get to do this one day this will be my blueprint.
Hi Adam,
wow, the bike looks great. Surely you’ve prepared yourself for a whole new adventure. We hope this baby will give you the many happy kilometres without to much troubles. But you know hat we believe the best and most memorable stories come out of “bad luck”.
Happy travels, keep us posted.
Big kiss from Holland XXXXXXXXXXXXXXXXXX
Ilse Maarten & Lilou
HI AD
you sure have been bussy,the suzuk is looking like a factory bike.nothing less I would have expected from you mate.
well done mate she looks the nuts.
all our beat family Peach.
Adam, Thank you very much for taking the time to put together such a well organized writeup. This page will be the basis for setting up my DR for my upcoming TAT ride. After seeing your bike 1st hand and riding with you, it’s easy to see your fabricating and riding skills are top notch. Again, thanks for the pointers and insight.
GREAT website – outstanding explanations. And even though I only ride a 400ccm Honda TransAlp – lots of great ideas I can use, too.
Wishing you all the best on your future rides!!!
Klaus
http://virtulanguage.com
http://japanlife.over-blog.de
Adam, Jim Brannon and myself had lunch yesterday and pondered where you were and how you are doing.
You did a great job in documenting your build and can vouch for everything you did being a long distance traveler myself…a few comments. It appears your computer is horzonital in the peclian box…Has that proved to be stable for your computer. My experience with rough roads the computers survive Verticle better than horizontal…If you need another Garmin like you have the Chart Plotter…I have mine I will let you have for pennies…If yours fails. I only used mine for 3 months and 20,000 miles…I like my Rider 2 Tom Tom….better and the GPS on my IPHONE>Also will purchase your maps for the Trail across america when you finish if you want to sell. I plan on doing the entire trial soon…The only must have for me you do not have is my Buddy Cup mounted on handlebar for my coffee, or ice tea if hot,iced beer, etc…a Spray bottle for water to keep me cool when it gets hot…I know from my own experience you a way above me with your travels…I hope the DR will serve you well. So far I like my KLR650. I think I will carry both hwy and trail sprockets and chains because it is not geared low enough to do steep hill climbs or heavy mud roads. I suspect the clutch will give out with stock gearing. Keep writing when you can. I know how hard that is as well..Wish I were on the road myself..I did 1000miles last week on my street bike, which of course does not count for anything.
Cheers
Michael Jones
It’s nice to know that other people read stuff like this!! I’m dead impressed with the build, it can only have been done by one as experienced as yourself. I thoroughly approve of the choice of the DR too, I reckon it’s far better than all the new fangled stuff for the job at hand. Having seen you riding my DR400 when you were here (Darwin), I reckon you needed the lower height too. It was like someone trying to straddle a six foot fence.
Outstanding job! I look forward to hearing how well your preparation works out on the road. Thanks for taking the time to share your insights with us.
Great website. Love the job on your DR. glad you changed from your Beemer. Found out the other day that a workmate of mine is a friend of yours. He is Tim Walker. We work together for METAL (motorcyclist education training and licencing)as instuctors in Darwin. I am also a DR650 owner and loving it.
Hope the trip’s going well.
Take care
regards, Kerry (Kezza) Johnson
Great web site. your mods on your DR will be my guide when i build mine. Thanks for sharing your know how with us. Stay safe and enjoy
I liked a lot of your mods. I bought the smaller tool tube and hung it off my back rack below the muffler, with a cookiesheet heat shield.
I also added the windscreen. I liked the way it took the wind pressure off my chest, but the buffeting noise was so bad that I took it off four days into a two week trip. Just exhaustingly noisy. I could not find a quiet place behind it except way forward, with my chin resting on the top edge of it. I may try cutting some slots in it to let more air through.
Interesting about the screen. Mines the same. Think I mentioned trying a spoiler when I get the chance. If it works I’ll add the info to the blog.
keep the updates coming! i’m prepping a dr650 for travel now – and I check back here periodically – its good to know what turns out to work and what doesn’t
Hi Adam,
I saw your bike in Denver last week at the REI store in Englewood. I pulled the website off of it and have been reading through your extensive archives ever since. Very impressive. I wish now I would have had the chance to meet you. I currently own a Ducati MultiStrada 1000DS. I have had the plan for a few years now to ride the bike to S. America. That day is rapidly approaching as my departure is now set for mid-Jan. 2011. However, after reading your blogs I am strongly considering giving up the Ducati for a Jap bike. I have rode dirtbikes my entire life and always preferred the Kawasakis. I was curious though as to what your costs have been to modify the bike to your likings?
Also, and I apologize if I missed it, but any tips you could offer on riding from N. America to S. America would be tremendously appreciated. Specifically do’s/dont’s and recommended routes. I am a bit apprehensive about such a large undertaking such as this but your site is giving me more courage.
Hi Nathan,
A MultiStrada is a bloody nice bike but given your background of dirtbikes I think you’d become very frustrated in South America, looking at all the off-road potential but being stuck on tarmac and light gravel roads(?)
I’m afraid I can’t offer any advice on riding from the USA to SA because I haven’t done it yet. I’ll enter Mexico in a few weeks to start my ride back to Bolivia and continue my plans where I left off in Bolivia. I’m an Englishman and I presume you’re an American so immediately our visa requirements/costs are different.
There’s no such thing as the perfect travel bike which is why nobody makes one, nor ever will. There is only what suits you for your trip.
There are parts of Argentina, Chile and Brazil where you’d appreciate the highway ability of a twin but the rest of the time, especially if you’re off-road, a single is sufficient. It doesn’t even need to be a 650. If I had longer legs I’d be riding a DRZ400 now. Kawasaki’s KLR650 is the most popular bike for travellers in SA. They come better prepared for a long journey than the DR650 (21l tank, comfy seat, screen) and make a better road bike. The DR needs all these things added but its lighter and makes a better off-road bike.
Whilst ADVRider.com is by far the best source of information for North America, I find HorizonsUnlimited.com more useful for the rest of the world.
The simplist advice I can offer is don’t overplan. Once on the road your plans will change on a daily basis pending a multitude of factors – who you meet/weather/bike maintenance/festivals/holidays/mood/whether or not you like your surroundings/health etc, etc. Having a few targets spread over several months worked well for Danny and I when we left England but we soon gave up on anything more.
There’s plenty of time for what/where/when once you’re on the road. Between now and you’re departure I’d make sure you’ve got everything in order at home: Online banking (at least two accounts with different banks), at least two credit cards with different banks and set up to clear the monthly balance. ALL of those accounts want to be linked so you can move money between them. Think about the billing address for those cards and who will be opening your mail. Some credit card companies will only issue new card to the billing address.
Research thoroughly whatever bike you choose. Take it apart.Put it together. What tools did you use? What spares do you need? Every bike has its achilles heel.
Vaccinations. Maps. Guide Books(?). Visa requirements/costs/processing time/locations.
People are generally good. We live in the western world where we’re brought up to be wary of strangers. Once outside that bubble you’ll be overwhelmed by the helpfulness and generosity of total stranger to the point you’ll be humbled many times.
You’ll meet plenty of other travellers along the way that will suggest places to see/stay/eat/avoid etc, etc. You don’t need answers to many of your questions before you leave, they’ll make themselves known to you as you go along.
If you’ve got just the tiniest inkling of the want to set off on a long journey, do it. The hardest part for me was letting go of my security – job/house etc. Once on the road everything is easy. Almost every problem I’ve had has led to a (good) experience/encounter/friendship that I wouldn’t otherwise have had.
Good luck
Adam Lewis
Adam,
I’ve gotta say, the last paragraph in this post has been one of THE most valuable to me, out of many post/sites/ramblings about RTW travel that I have read… I did a “walkabout” 12 years ago for a year in SA and am feeling the itch again. I just returned to riding motorcycles after a 20 year pause (and I didn’t have much experience when I quit) when I bought a Honda CRF230f in June… “lots” of off road later, I bought a ’98 DR650… I can almost taste a long trip coming my way… I’ve promised myself that I will last 10 years at my current job, till 02 Jan 2011… then all bets are off! Thanks for all the awesome mod info on your bike and for posting about your experiences.
If ever in ATL contact me for some crash space, otherwise ride safe!
Best regards, Darren
Cheers Darren…where the hell is ATL!!!???
Using airline codes, 6 years working for Lufthansa will do that. Atlanta, Georgia, US of A. You’ve already rumbled past me!
I just stumbled across your blog from a link over on HUBB. Fantastic story – love the photos. I do have a quick question about your luggage that I could not find the answer to in your posts. What make of bags are you using for the rear panniers? How satisfied are you with them? I am in the midst of planning a 6-12 month journey through Central and South America on a DR650, and really like the way you outfitted yours for overland travel.
Thanks,
Andy
Hi Andy,
I’m using Andy Strapz panniers. The other option is from Steel Pony. I’m very happy with the Andy Strapz and the support they give their product. I had one bag burst a seam on the TAT and when I emailed them they just asked for photos and an address to send a new pair to under warranty. You can’t ask for better than that. Its a shame a certain famous Swedish suspension company doesn’t have the same attitude!
Good luck with your trip. The Andes are special 🙂
Adam
Hi Adam,
Just wanted to say I am loving the updates. Especially where you have highlighted in blue font, your experience and changes to the DR along the way.It could become a bible for the DR enthusiast. I have recommended you site to many a fellow rider.
All the best.
I spent 4 months driving around Australia in a modified campervan. If I did it again, I would do it on a bike. Love this blog! If you every write a book, I’d buy it.
Thanks for updates on your modifications – great to know how all all your equipment is holding up. Thanks again
G’day Adam,
Thanks for your Info on the Dr. I have been worried about my total load of 141Kg on my next trip down the Canning Stock Route. I have made a right hand side stand for mine. It is great for mounting and takes the worry of the bike falling over to the right when parked. pannier are old Givis’ with there quick release lockable mounts and bracketed on by me. I need bit over 50Lt of fuel for the trip. I carry it in the safari 35 Lt! tank and a 20 lt plastic can on the rack behind the seat with a Dryrider bag with tucker Ockyed on top. What do you use as a rough figure for fuel consumption- needed for long distance on mainly track riding./
Gordon Kidman
Hi Gordon,
Good luck with the Canning Stock Route – that’s a REAL adventure and something I’d like to attempt in the future. Can’t see it ever happening though with a pound now worth a paltry AU$1.55!!!
I presume 141kg includes 50l gas, food, water AND YOU!!!??? My luggage weighs 27kg inc laptop, DSLR and associated cables which I certainly wouldn¡t be lugging down the Canning Stock Route. add to that Tools,2xtubes, consumables totaling 3kg, an average food total of 8kg, 8l/4kg water, 33l gas and my load is 75kg + me 68kg = 143kg. For the Canning I’d ditch my electronics (apart from the DSLR) and vastly reduce my food variety which I reckon would get me below 135kg. If you’re including your extra 10l gas in your 141kg then I reckon you’re doing OK.
Please keep me posted on your progress/blog/ride report.
Unsupported(?) the Canning Stock Route is the REAL DEAL!
all the Best
adam
Oh… And a full tank is good for approx 600km. 18-19km/l. 20% less in a headwind
Your write up is brilliant! Thanks for sharing both your trials and triumphs.
Great job on the site Adam.
Every single time I read the title of your adventure I just about bust a gut laughing.
…short on legs … short on hair … short on cash.
PRICELESS!
I’m on the verge of setting off myself on my new DR650.
Cheers Greg!
Happy travels on a great choice of bike!
I have really enjoyed your trip report and I have learned much in the process. Donation sent, have a couple cold one’s on me. Ride safe.
Trent
Thnaks for this amazing blog
Suzuki DR 650 review
Would you share the fuses you took with you please? Thanks Carcajou
All of the OEM Suzuki ones, GPS, additional charging (that I added) and headlight power supply (also added by me).
Would you share the both the collapsed and extended length of your prop stand, please. Thanks Carcajou
Adam, mike here…..burntout pillswallowing hehehhehehe
I hope this hasn’t been answered elsewhere or on ADV rider, but can you share with the audience why you chose not to put a case saver chain guard and steel chain guide on the DR? Thanks!
Hi Michael,
The case saver was chain guard was something I overlooked and meant to have made once I was on the road in Latin America but ultimately I forgot about it. Steel chain guide? Not aware of that. Can you post a link to a photo?
And yes, selling Rosie was a difficult decision!
Cheers
Adam
Adam,
For such a robust platform, I was shocked to see how weak the crank case seems to be. I put on some side armor, like Rosie had (past tense /sad face/), but always worried about what a chain might do to the back.
As far as the steel guide… this product from Procycle boasts replaceable wear blocks;
Something to consider for part 2, I suppose.
Have you thought about what you might ride in part 2? Or is that too far ahead at the moment. Also, for us philanthropists, please post what your next platform will be (if and when you decide) and what you can’t get direct help for so we can repay you for all of your efforts in part 1 with a donation.
Again, thanks for putting this wonderful project out in a public forum.
Warm regards,
Michael
great article and informative to the extreme. Interested to note that you’re still not totally enamored with the front fork setup. I think I’ve decided to just service mine and put a heavier weight oil in for starters.
I just did 5250kms up the NSW dog fence to Cameron Corner, Innamincka, Birdsville then the Strezlecki track and every bit of dirt I could find to Hillston (central NSW) with one of the new 21 litre Acerbis fuel tanks (substantially less weight on the front than the filled Safari) and 30-35 kgs of luggage on the back and found I could cope at around 100kph as long as I used a bit of throttle and sat back on the soft stuff.
(I have a heavier rear spring because,as you found, it teetered nearly upright on the sidestand when loaded.
The joy of these bikes is that I can do whatever mods I wish to the DR – bend it, weld it, add longer tool tubes etc whereas I just couldn’t have that attitude with my F800.
Then there are guys like yourself willing to share information with the riding fraternity which is an encouragement.
In a sense doing and testing the mods to the bike are going to be as much an adventure process as the trips themselves.
I’ll keep this article in “favourites” for future reference. Thanks again and happy trails
Hi Steve,
Glad to hear what I’ve posted has been of use. Nice ride up the dog fence. I wish I’d been on my DR when I did that and not my F650. Walkers crossing was probably my favorite dirt track in Oz.
Remember though, the Safari tank is only as heavy as the fuel you put in it. If you don’t need it full then don’t fill it!
I like your bike
can you give me your bike as gift?
Sure…oh wait, no, I sold her….damn…you nearly had an early Christmas present! 🙂
Adam, what are you riding now?
Hi Joe,
Well, I spent the summer riding a 500cc Royal Enfield Bullet whilst I worked for
I now have a Suzuki DRZ400SM that I’m about to start preparing for 2013 and beyond. I’ll start on it when I return to the UK in early February. As soon as I do I’ll be posting the build-up and my plans for 2013.
Interesting…
Curious to know your thoughts on the DRZ400SM over the DR650.
Too early to tell. I’ve only ridden it a few miles around town. It won’t stay a true SM though. It will get 21/18″ wheels amongst other mods.
Interesting…
Curious to know your thoughts on the DRZ400SM over the DR650.
And what made you decode to go DRZ400SM instead of another DR650?
Are the lowering options as feasible as with the DR65?
There are several reasons, all of which I’ll cover when I start posting the build-up in early February. Cost and availability being the two major factors that I’ll cover in more detail.
Rosie wasn’t lowered apart from the Renazco seat being built 1/2″ lower than stock.
Hopefully I won’t have to lower the 400 either. Part of the reason for using a SM over an S
Wow. Thanks for sharing all your mods on the DR.
Your bike has quite a few ideas I plan on implementing. Just picked up my first DR (been on KLR’s for some time). Have to say we seem to be on similar pages. Just sold my 05′ Bullet to do this build. Your trials and tribulations will be a time saver. Kudos to the report. Maybe we will see each other on the trail!
Hi Adam
I am a brit living in California. I was a motorcycle courier for 20 years in London untill i moved here 6years ago. Just bought second hand Dr650, great to be back on a bike after 6years. It has an IMS 4.9us gal fuel tank which is like a 200mile range. Over here IMS does a 6.6gal tank. Do you think i should go for the larger tank. 200 mile tank range does not seem much in the more remote places or do you find you can always find petrol for sale.
Thanks
Iain Foxwell
Hi Iain,
Well that decision is entirely up to you. I used the Safari 30l tank (which actually held 35l!) from Just Gas Tanks. Personally, I liked the freedom it gave me to explore. As the father of a good friend of mine once said…”A small amount of gas represents a long walk’. Lots of good desert riding out you’re way. I’d definitely be using a bigger tank.
A courier for 20 years eh? Then you must know (or have encountered) another good friend of mine, ‘Dangerous’ Dave Martin. Now residing in Auckland?
Cheers
Adam
Hi Adam,
I have a couple of DR 650s that the wife and I both love. Great, simple bikes. A friend is thinking of one and sent me this site to look at. Great info. Your comment on the seat is one of many DR riders. I took both our bikes and butts to Rick Meyer Cycle near Anderson, CA. (Near Redding, CA). Rick makes the seats for you, while you wait. (Or mail order of course). We have done many 350-400 mile days following the addition of the Rick Meyer seats. He uses the stock pan. Cuts, trims, adds to make the seat a very comfortable seat. I’ve many seats done by them. All very good. Great info in your article. I’ll re-read it a couple of times.
Thanks
Dick
Hi Dick, Glad you enjoyed the read. I have heard a few people mention Rick Meyer. Personally I think that one of the keys to a comfy seat is that it is parallel to the ground (thereby avoiding pressure points). My short legs make that a virtually impossible task and so I’m not convinced anyone can build me a truly comfy seat.Renazco did their best to help me (even rebuilding my seat FOC) but the bottom line was it had to remain the same shape.
Cheers, Adam
Hi Adam, I enjoyed your blog and will use some of your tips for my DR which I now use for similar reasons to your replacement of the BM, my old 100GS is just too heavy for serious off road action,now that I,m pushing 60.So good luck, if your ever in the S of France drop by. best, Phil
Hi Phil, Glad you enjoyed the read. The DR650 really is a great bike (I miss mine). I’ll be sure to drop you an email next time I’m down your way.
Cheers, Adam
Hi Adam, I’m an old DR rider from Illinois and I just ran across your site. I am also passionate about touring/adventure on DR’s. I call my 2011 650 ” Shadowfax” after Gondolf ‘s horse in Lord of the Ring. Yes, I am partially insane. Anyone who rides an enduro from Chicago to Guadalajara regularly could be construed as such. I am planning a trip from Baja to Costa Rica along the Pacific Coastal Highway. I want to make a documentary of the voyage. Let me know if you are interested in joining the team? Ron
Hi Ron,
Unless something drastic happens, my travels will be in Asia (or closer to home) for the foreseeable future. But thanks for the offer!
Have a great trip. There’s some good riding in Baja.
Cheers
Adam
Hi, Adam! I have been following your blog and am currently getting prepared for a trip from Germany to Iran (where I live as German expat) the coming summer. First of all: if you happen to come to Iran we would be really happy to invite you to our place.
But my question is: as this is a low-tech country when it comes to repairs and/or supply of spare parts I was wondering whether a kick-start bike (like a TT600 or XR600) or a Kick-plus E-Start bike would not be better than one with an E-starter like your Suzi. Did you ever run into trouble (or have to push-start your bike) because it lacks the kicker?
Thanks for your reply!
Greets, Daniel
Hi Daniel,Iran is on my radar for a return visit. Where in the country are you? I have short legs and so a kick-start bike is of no use to me. Iran may be considered a low tech country but I bet almost every motorcycle sold there has an electric start.
Only once did I have to push-start my DR650. It was at 4700m in the Chilean Andes and had been -12°C in the abandoned wooden hut I slept in.
Good luck with your trip and maybe one day I’ll see you in Iran!
Cheers Adam
Hi, thanks for the information. I am located in Tehran. And – after almost 15 years in this country – quite well connected to all kinds of motor vehicle activities. So, in case you think of passing through, drop me a line. I will be here (at least) til summer 2015. Greets, Daniel
Adam,
Do you use a clip type master link on the drive chain? The alternative would be a solid master link but this requires a heavier chain tool, no? The manual recommends taking off the swing arm but this seems like a lot of trouble on the road. How much maintenance do the swing arm bearings require if you don’t service it at chain replacement intervals? Thanks.
Bruce
Hi Bruce,
I always use a clip type on a single cylinder dual sport bike. They don’t make much horsepower and I’ve never had a problem. I do however carry 3 spares. Two to add a length of chain should it become damaged and one to replace the on fitted should it become worn (this can happen depending upon your chosen sprocket sizes and how they effect the vertical chain alignment through the guide).
If your swingarm bearings are in good condition before you leave home, you pack them with waterproof grease (I prefer Bel Ray) and fit new seals then they will go a long way before needing servicing. When I returned from South America after 115,000km I removed the swingarm to find the grease still intact and no signs of wear. The linkage bearings are remarkably well sealed (unlike my F650 which were a joke). I seem to recall checking them twice and just adding a little grease.
Adam,
Thank you for your prompt reply, I will certainly defer to your wisdom on this. I’ve been in remission for fifteen years from the BMW brand having put a couple of hundred thousand miles on them. I’ve had the DR for a year now and I’m totally in love with it. Not to take away from the trusty KLR, (I put 15.000 on one), I like the feel and mechanical accessibility of the DR better. The only reservation I have is overheating in hot climates. You seem to have had no problem in SA. I’m thinking full synthetic and changing it more frequently, say at 4,000 miles. Another issue is the carb at high elevations. I know that you have an aftermarket carb but do you think the stock one needs re-jetting for the Andes? Having been to SA (on a 650 V-Strom) I know that the magic potions that European brands seem to think their bikes require are hard to come by. I had a hard time finding chain lube. Is this what drove you to the Scott oiler? Sorry for the barrage! Killer photography! Thanks again.
Bruce
Hi Bruce,
I bought my DR650 from a guy in Salt Lake City who’d already fitted the 39mmFCR carb and jetted it for his locality. SLC is at an altitude of 1300m and as a result Rosie performed pretty well in the Andes – the highest I rode being 5088m. I’m sure recall reading somewhere that a CV carb will perform better at altitude? I’d be tempted to look at what jetting set-ups the guys riding in Colorado are running and start from there. I’d certainly do the 3×3 airbox mod.
As for oil the decision is often made for you by whats available when you need it. Being air cooled and low revving I’m not convinced of the need for expensive synthetic oil. 10w40 diesel oil seems a good option as it doesn’t contain the friction inhibitors that are said to be problematic with wet clutches. The Scottoiler means I don’t have to carry chainlube which means one thing less to pack/find space for. If I can fill it up with chainsaw oil then great. If not it just gets engine oil.
DR650 will get my vote every time. For the kind of riding I enjoy its the best option out there, not to mention outstanding value for money.
Hope that helps
Cheers…Adam
Adam, Sorry for the delay in returning this, I rally appreciate the info. I took my V-strom down there and I used Mobil 1 when I changed oil. I don’t know if Rotella T-6 is available where you are but it’s relatively cheap ($24 a gallonº and full synthetic Shell oil). I’m told by the dealer that Suzuki ‘bases’ its synthetic oil on Rotella T-6. This probably means they pour it into quarts and charge $15.00 for it! I did research this and I have run this oil for thirty thousand miles in both of my bikes with no adverse clutch issues. I didn’t think to use bar oil for the chain when I was down there. I’m a little leery of oilers, not for any direct experience, though I did try the “Loobman” which is a cheap gravity feed unit with mixed results.( I made 18,500 miles on the oem chain.) You seem to have had good results with the Scott oiler—is it the vacuum unit or the electric one? Do you always run knobbies? I’ve found Shinko tires to be surprisingly good (and cheap) dual sport tires. I got to the edge of the Uyuni desert and backed down. The V-strom just seemed too heavy in front. Maybe next time with the DR! Your pictures are killer. Thanks again, safe travels. Bruce PS I understand if you’re too busy to respond I don’t want to pester you and I rally appreciate your replays, thanks again.
What are your thoughts on the bmw belt drive as opposed to chains? Currently have BMWK1200GT used for 2 up road travels in NA but in reading the various avr sites most have much smaller bikes. Thought of getting 800 GS when no longer needing the GT or too old to hold it up! Live in Barrie Ontario Canada.
I’ve only encountered belt drive once. It was in Mendoza, Argentina where I met a Spaniard who’d ridden his Harley to Ushuaia and back. Well, nearly back. A stone got in the belt and snapped it resulting in 350km in the back of a truck. So, belt drives and dirt roads? No thanks.
G’day Adam, thanks for producing such an informative blog, great stuff! You’re photos are absolutely brilliant and I was wondering what you carry in your camera kit? i.e make, model of camera/lenses etc. Keep up the great work and enjoy your travels! Thanks
Hi Jarrod, In 2006 I carried a Konica/Minolta A200. 2007-Oct 2010 a Nikon D80 with Nikkor 18-200. Since then a Nikon D300s, Nikkor 18-200, Nikkor 35mm f1.8 and a Tokina 12-24 f4 MkI
Cheers
Adam
Hi Adam, nice collection of camera equipment for sure. Whereabouts do you store it on the bike? Have you had any security issues with taking/storing this amount of gear? Sorry to bombard you with questions 🙂 I have a canon 40D that I take on the bike with me and I can never seem to find a convenient, waterproof location to stash it while riding, although that’s probably down to the fact that my tank bag is a bit smallish. Anyway, thanks again and safe travels! Cheers
Fella’s like yourself have inspired the purchase of a New DR650 last weekend! Mindless trips on the pavement always have me longing for a dirt road and a place to pitch my tent. I like my VStrom but am excited for the weight reduction. The stock DR seat will be the first to go, yikes!
Safe travels and Great Pics.
Great write up. Small hint; use your proposed on-bike tool kit while prepping or working on the bike prior to departure (rather than reaching into that lovely set of Craftsman). This gives a great idea of what tools you really need, what you don’t and if they are actually up to the task.
Hey Adam,
I am on my third DR650 and they are awesome. I love your mods and am particularly intrigued by the ASV clutch lever and perch that you purchased. I cannot find any specific listing for the Universal lever or for a DR650 on their site. Can you shed some light as to what you bought? That is exactly what I want to do to mine.
Regards,
Greg
Hi Greg, It was 6 years ago that I built the bike so I guess things may have changed. I don’t recall buying a DR specific lever, just the ‘universal’ one. As long as there’s no extra mounting for a switch then I don’t know what would be so bike specific. Lever throw perhaps? I’d call them if I were you,or email them with a photo of the OEM unit?
Hope that helps
Adam
Hi Adam, is there a gear list anywhere on your website? I’m a uni student in melbourne and am looking at setting up my DR650 for a cape york trip and eventually touring canada. Im interested to know what panniers, bags, stove/cookset, tent etc that you used and your thoughts on them. Also how did you pack? ie what went in where? Are you still working as a tour guide for blazing trails or have you moved back to england and put a hold on the nomadic lifestyle? Loved reading your blog. Cheers mate!!
Hi Alex,
Yes, I still lead the tours for Blazing Trails in India and Nepal. Just returned to the UK and am frantically trying to prepare two DRZ400’s for Morocco so apologies for this being a swift response.
I had Andy Strapz bags on the 650. A little small for a long trip in cold conditions hence the Ortlied dufflebag (49ltr). I used Magadan panniers on the 400 for Central Asia/Siberia/Mongolia. Tent is an MSR Hubba Hubba HP which I think is excellent. My favourite stove has been the Coleman 442 but their characteristics change every time one replaces the generator. That’s the brass tube that runs across the top. I took an Optimus Nova to Magadan. It got constantly clogged-up with the poor fuel and I had to run it without the fuel filter. That just moved the problem further along the line. I am currently looking for another 442 for Morocco. Packing will evolve. Don’t expect to get it ‘right’ first tme. It will change depending upon climate and whether you are camping or hosteling etc.
Hope that helps
I’m off to the workshop to fit my new fork springs 🙂
Adam
Hi Adam, great write up. I’m curios as to know how many km’s your DR had on it when you first bought it?
I am also looking at buying one for touring 🙂
Clive
Hi Clive,
Blimey! Now you’ve got me scratching my head! It was definitely 4 figures (miles). I want to say 8k but it may well have been 5k.
The best long distance dirt road travel bike available in my opinion. Wish I’d never sold her.
Great thanks so much, good to know you were happy with her!